How to create the perfect plant - Part 2
Introduction
The Groasis Technology is introduced by AquaPro Holland, a private company founded by the inventor Pieter Hoff. The Groasis Technology is a biomimicry technology and consists of: 1) improving the soil with mycorrhizae; 2) leaving the capillary structure intact; 3) using plants with the right primary roots; 4) the use of the waterboxx; and 5) if necessary when planting on rocks, the use of the capillary drill. The Groasis Technology is a copy of how Mother Nature solves the problem of planting trees in deserts, eroded areas and on rocks. This way we can replant the deserts and other degraded areas, and make them productive again.
The importance of the primary root
The principle way of Mother Nature to reproduce and multiply is by sowing seeds on top of the soil. The seeds are, in general, transported and deposited on top of the soil by means of wind or through the excrement of animals. The seed then starts to develop its primary root to find water, and then the plant establishes itself. Once the primary root has found water, the plant starts to develop secondary roots, and then starts to grow and evaporate.
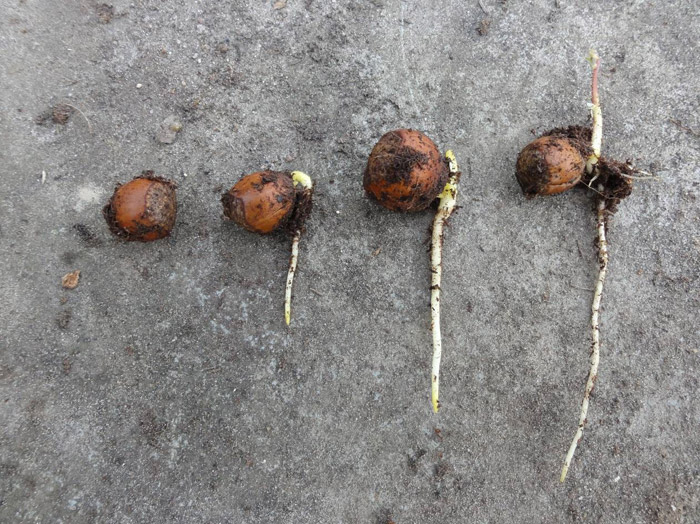
Mother Nature's planting technique in 4 stages on one photo.
How to correctly produce roots
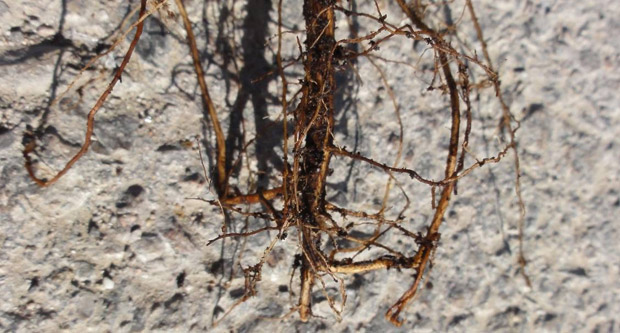
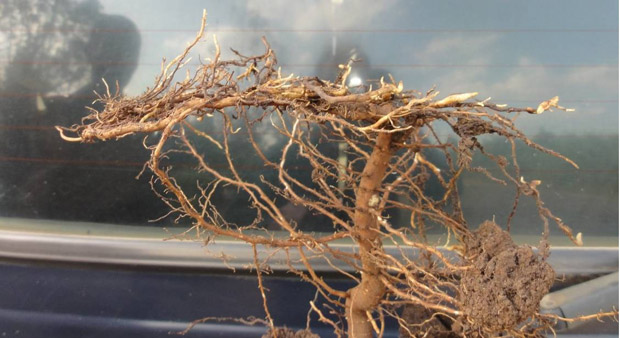
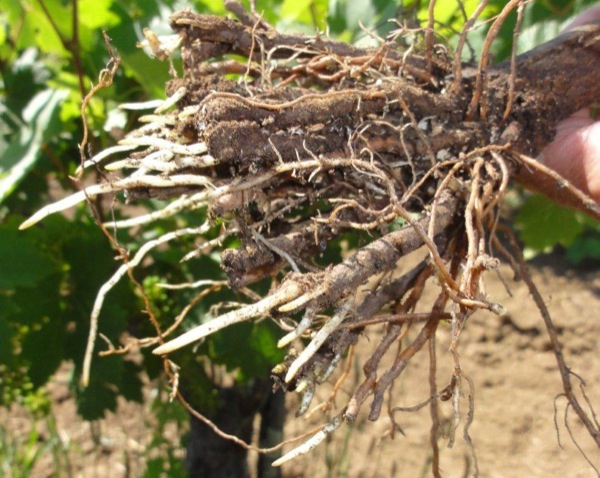
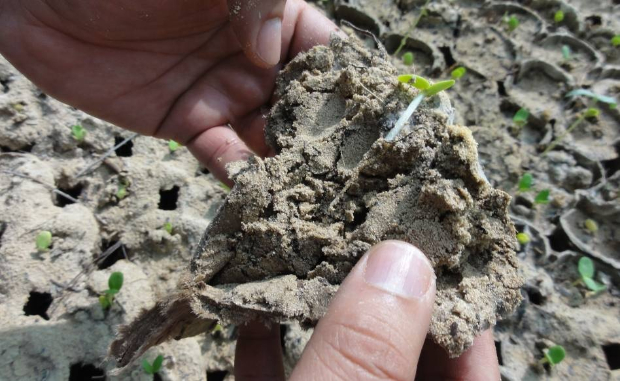
Plants sold today, multiplied with modern production methods, are produced with deficient primary roots. The plants are grown in a way so that the primary root is touching the bottom of the planting medium, and then splits into secondary roots. AquaPro has bought and photographed plants in more than 20 countries, and until now hasn't found one plant with an intact primary root. All plants found have destroyed primary roots and over-developed secondary roots. These kind of plants are not able to survive dry periods or dry soil without the help of irrigation. Secondary roots are also not able to penetrate deeply or break rocks. Here are four photos that speak for themselves.
 Destroyed, split and upward growing primary root grown in plugs in Spain.
 Destroyed, split and horizontal growing primary roots grown in plastic bags in Kenya.
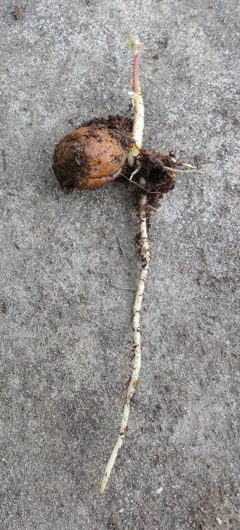
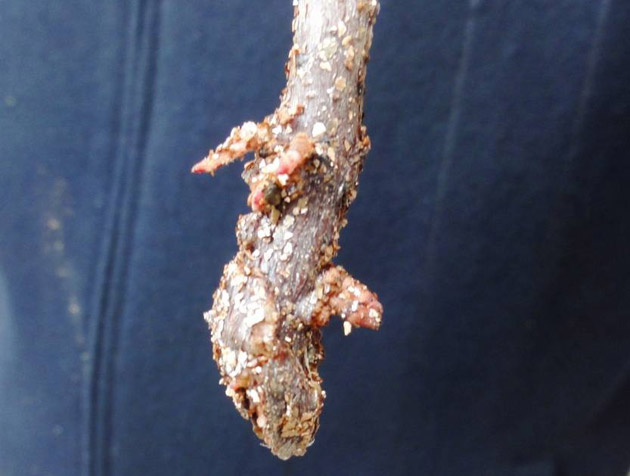
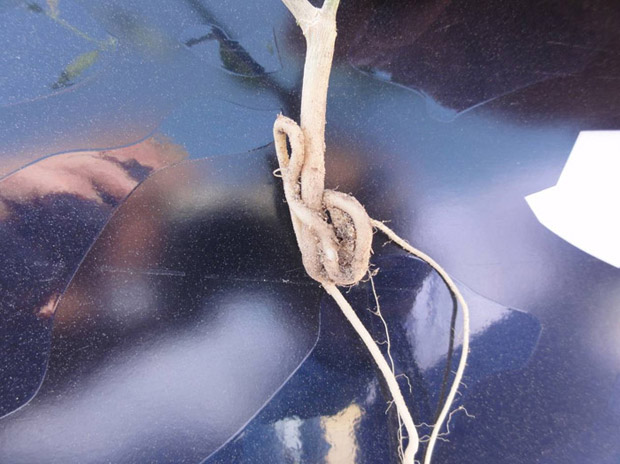 A young plant in Dubai (before transplanting into its 2nd pot) has a destroyed, twisted primary
root. After being transplanted to the 2nd pot, two smaller and thinner roots have developed, which lack the power of the original root.
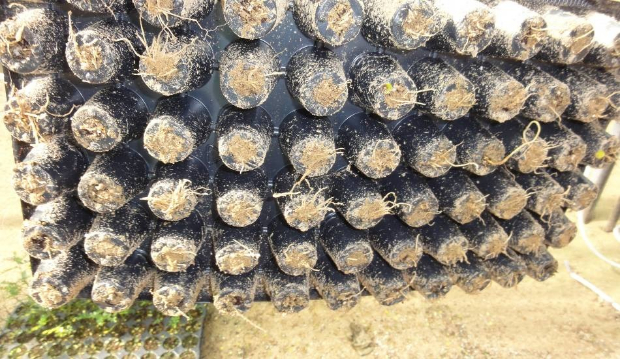 All primary roots are destroyed and grow horizontally under the plugs.
How to recover destroyed primary roots from older plants
In recent years AquaPro not only learned to produce plants with perfect roots. We have also learned to repair the plants with destroyed taproots. You can find an extended video and photos on how to do this here, Plant instructions for the Groasis Technology.
Result four weeks after planting: recovered vertically downwards growing primary roots.
A new quality standard
In order to get plants with optimal roots, AquaPro has studied and seriously investigated the development of roots in Mother Nature compared with those produced in modern plant producing companies. In order to get a quality root comparable with the power of the root that develops from a seed, AquaPro has developed a new type of plant producing tray - the PENROOT paper plug. This tray is made of paper pulp, and its model is based on developing and keeping intact both the primary taproot (or penroot), and the secondary roots. This technique produces a plant with a primary root which can better penetrate deeply – even through rocks – and to always have enough water even through periods of serious drought; and plants with secondary roots which can penetrate widely in order to optimize the capacity to absorb oxygen, macro- and micro elements and water after a rain shower. Additionally, AquaPro has introduced a set of minimum standards that are to be used by growers while producing the plants. Growers who use the PENROOT paper plug and follow the standard minimum requirements set by AquaPro while producing, can apply for the 'Groasis Certified Plant Grower' Certificate. Once they have applied, they will be visited by AquaPro or its delegate, to assist with the application procedure. Once this procedure has been fully satisfied, a 'Groasis Certified Plant Grower' Certificate will be provided. The basic elements of planting success lie in plant production: start by making a plant with a perfect root!
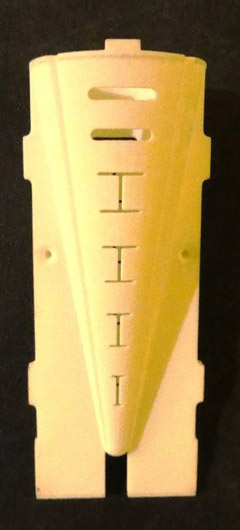
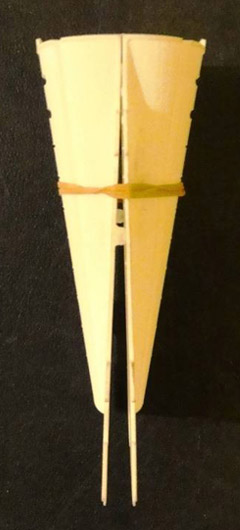
These photos show the PENROOT paper plug and the development of the primary root in it. The
plug is placed on two small feet. In between, the primary root is air-pruned and therefore keeps its vertically downward orientation until the moment of planting.
Root bud development of a cutting in a PENROOT paper plug. Cuttings develop more than one
primary root, but these roots are weaker than the single primary root of a seed.
How to sow the seed or plant the cutting in the PENROOT paper plug?
With the Groasis Technology we can plant year-round as long as temperatures are not higher than +35°C (+95° Fahrenheit). In order to develop the ideal plant - a copy of Mother Nature as you see in the pictures above - one needs to know:
- the germination time in days;
- the time in days until the primary root lengthens to about 10 cm (4 inches) long;
After germinating and rooting, we harden the plant approximately - 14 days before we plant them outside.
We sum up these 3 time periods, which is the number of days we sow the plants indoor before the ultimate outdoor planting date.
How to help the seed germinate?
Not all seeds germinate easily. Some seeds need to be vernalised; this means that they first must receive a period of cold before they can germinate. This is a way that Mother Nature protects seeds in countries with 4 seasons, including a harsh winter, from germinating too early. For example: if an acorn germinated immediately after falling to the ground in October, and then this young plant was subject to a heavy frost, the plant would die. Thus, the seed doesn't germinate until it has been vernalised. This usually means it requires at least 3 months of low temperatures before it is able to successfully germinate. Thus, the seed comes undamaged through the winter, and in spring, it will germinate. Some seeds from natives where no harsh winter exists, have other protective mechanisms. For instance, above 30°C they no longer germinate. This natural mechanism prevents seeds from germinating just before the summer when they would most likely die due to drought. It is important to check your seed and determine its growing characteristics and requirements. Once you know that your seed can be sown, you can greatly stimulate germination if you soak the seed in water for 48 hours. You may also keep it in a closed box with wet tissue paper for 72 hours. After this treatment you can sow the seed in the plug. After soaking you can see the primary root already breaking out from the seed. At this point, it is possible to select the seeds to sow: those that do not germinate by this time, are probably not fertile. It is best to not sow them, or soak them an additional day. If they still have not germinated, do not sow them!
How do we help the seed further germinate and grow after sowing?
All plants like the combination of oxygen and humidity. Where there is water, there is no oxygen. So by this principle, a combination of humidity and oxygen gives the best result. This is how you do it:
- After sowing seeds in the plugs, we start by giving water in a very careful way;
- On the 1st and perhaps 2nd day only (see next point), every 1/2 hour, give the plugs 1 minute of soft 'rain' via sprinklers. If you water by hand, use a very soft spray as we do not want compacted soil which inhibits oxygen availability for the roots;
- Continue watering in this way until you find that the soil in the bottom of the plug has become humid;
- Once humid, change the watering system. Begin to maintain the Relative Humidity (RH) at 100% - i.e. we stop giving water and start giving humidity;
- You do this by carefully watching the climate, and then – in general - follow this timeline: at 7AM, you give 1 minute of 'rain'. Repeat this 2 hours later at 11AM. Then you give 1 minute at 12AM, 1PM, 2PM, 3 PM and 4PM. Finally, you give 1 minute of rain at 6PM and 8PM.
- The thinking behind this watering timeline is to increase the frequency when the sun is shining strongly and temperatures are rising accordingly. When this happens, the RH drops dramatically; so you have to 'repair' this by intensifying your watering schedule. However, if you do not have such hot conditions, it might well be that you maintain a 2 hour frequency even during the day;
- As soon as the seeds have germinated 100% and your plants are approximately 1 cm high, reduce this watering frequency. At this point, we are going to 'harden' our plants. Instead of keeping the humidity high, you go for a climate where the humidity is low. You do this in a 'soft' way: you go 2 days at a 2 hours frequency, then 2 days at a 3 hours frequency; after that, you only water at 7AM, at 12AM and at 6PM;
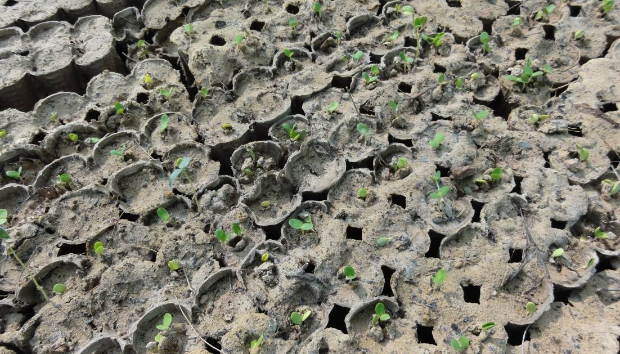
These seeds have germinated perfectly and the plants are ready to harden. - By giving the plants less shade, the leaves do not grow too big, but stay compact. This causes less evaporation and less burning after we have transplanted them to the final place outside in the waterboxx;
- Steps 7 and 8 are meant to prepare our plants to survive well outside, even when it is hot and dry;
- Success!
How to use the PENROOT Paper Plug
As you can see, the bottom of the plug has two feet. The primary root that penetrates the bottom of the plug, will wait between these feet, if we air prune it well. Therefore, we need to put the paper plugs on a dry surface - preferably a plant table or a box - so that air and wind can ventilate below it. The size of the plug is 5 x 5 cm - so we have approximately 300 plugs per m2.
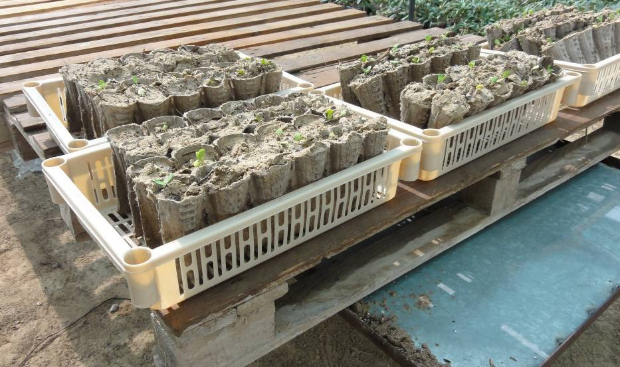 Put the plugs on a ventilated surface to airprune the primary root.
 The perfect root!
Which plants can we plant with the Groasis Technology?
The Groasis Technology is a planting methodology for any plant, no matter whether it is a tree, a shrub, a bush, a vegetable or a flowering plant. However, it is important to understand that this technology is not an irrigation system. Rather, it is a planting technology. It is a way to plant a plant in such a way that after one year, the plant is able to deal with the local conditions; this means that your plant must have the capacity to deal with them. If you have 300 mm (12 inches) of rainfall, and the plant needs 400 mm to survive (for each species its need is known), it will die after the first year of help with the Groasis waterboxx. If you have 300 mm of rainfall and your plant needs 290 mm to survive, it will survive forever after the first year of help. Like in Mother Nature.
Mycorrhizae
The roots of all plants on earth do not 'eat/drink' directly from the soil. Instead, they cooperate with mycorrhizae - funguses that are naturally in the soil and break down macro-elements (N-P-K-Mg) and micro-elements; they then 'give them' to the roots. In exchange for that 'gift', mycorrhizae receive about 30% of the sugar production from the tree/shrub. Without this exchange, trees/shrubs cannot grow; they must have mycorrhizae to help them grow. If we start in a very dry soil with almost no mycorrhizae, our plants will grow poorly. Therefore, it is an important part of the Groasis Technology to inoculate the soil in the PENROOT paper plug with mycorrhizae and later, in the soil below the waterboxx.
How do we make soil with mycorrhizae for the plugs and the soil below the box?
Once you know the species or variety that you want to sow or plant in the plug, go and find a place where this species grows. Then collect the soil and leaves from below those trees/shrubs. Mix that material with the soil you need to fill the plugs, and that you want to put below the waterboxx. The plug is approximately 50 cc, and below the waterboxx we want approximately 500 cc (1/2 liter).
Now you have soil with the right mould spores (mycorrhizae); and as soon as you start to water the plugs after sowing, these spores will develop. Your plants are then inoculated with the right mycorrhizae.
After preparing the planting place (keeping the capillary water transport system in the soil intact), but before putting the waterboxx in its place, we add the same mix - about 1/2 liter on top of the soil (but below the waterboxx). After putting the waterboxx on top of the planting place, the sleeping mycorrhizae will develop because of the proper temperature and high humidity below the waterboxx.
Requirements for a grower to make perfect plants:
- Company and equipment need to be clean and representative.
- Equipment needs to be safe and offer good protection to users.
- Plants will be produced in the PENROOT Paper Plug.
- Plant protection has to be done according to local laws.
- Plant material has to be supplied according to local laws.
- Plant material has to be minimum 99% true variety according to the order.
- Plant material has to be supplied in a sound condition and with white roots.
- The root system has to consist of at least one undamaged primary root and undamaged secondary roots.
- Plants may be produced in a plastic or glass greenhouse, in a plastic tunnel, or outside.
- If produced in a greenhouse, the roof and the sides of the greenhouse must be able to be opened.
- If produced in a tunnel, the sides of the tunnel must be able to be opened.
- Shading must be done with white shade net, above the greenhouse, tunnel; or if produced outside, over the plants. Black shade-net is not allowed.
- In the last 14 days before shipping, plants must be hardened through growing under as-dry-as-possible conditions with the highest possible light intensity.
If you follow these recommendations with your plant propogation, you will have unexpectedly high survival rates, regardless of difficult circumstances.
The Planting
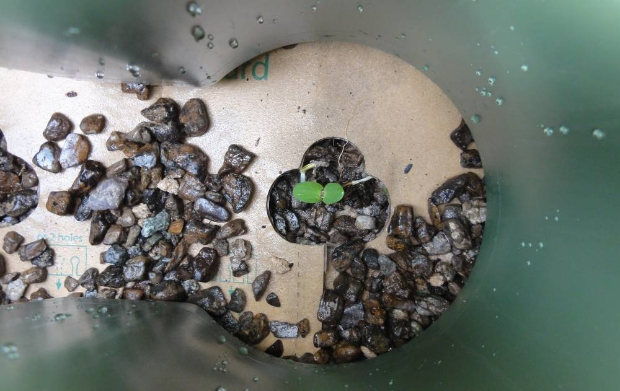
On the website you will find the link 'Manual's. There you will find all information on how to plant the plants in the waterbox. It is very important to place the sleeve opening in an east-west orientation. This way, the sun enters the opening in the morning and in the evening; but it cannot enter and damage the plants between 10AM and 4PM. Look at the picture below. Note the shadow that the opening causes during the hottest part of the day.
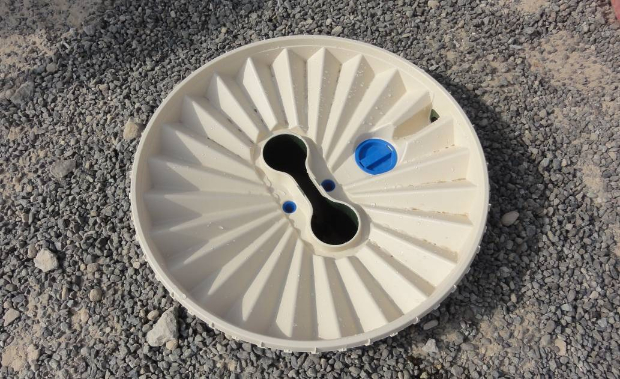
This detailed photo shows that the little plants are protected well in the center opening.
AquaPro wishes you good success.
AquaPro – Holland
Pieter Hoff
CEO
Ps: we strongly advise you to read the 3 following links:
http://www.groasis.com/page/uk/saplings.php
http://www.groasis.com/page/uk/material.php
http://www.groasis.com/page/uk/lessons.php